
Claude Code Basics: 6 must-know tips when you start building
Hello World
I’ve gone all in on AI in the terminal with Claude Code as my favorite sidekick. If you’ve been living under a rock, Claude Code is Anthropic’s AI assistant that does anything and everything for you.
Give it an input --> it flibbertigibbets --> gives you an output you want. Whether you speak Code or you speak plain English, there’s nothing better than it. It can build anything (almost) you can imagine. If you haven’t tried it already, seriously go do it, it’s pretty good.
I’ve been using it for a while & recently decided to take the ‘Claude Code in Action’ course from Anthropic Academy just to see what Anthropic thinks you should know about it. I have a few takeaways below from the course that I thought are worth sharing, especially if you’re getting started or you just want a more efficient AI assistant that uses your precious tokens more wisely.
NOTE: You will need to subscribe to a Pro or Max plan from Anthropic to access Claude Code.
#1 - Claude Code vs Claude Models
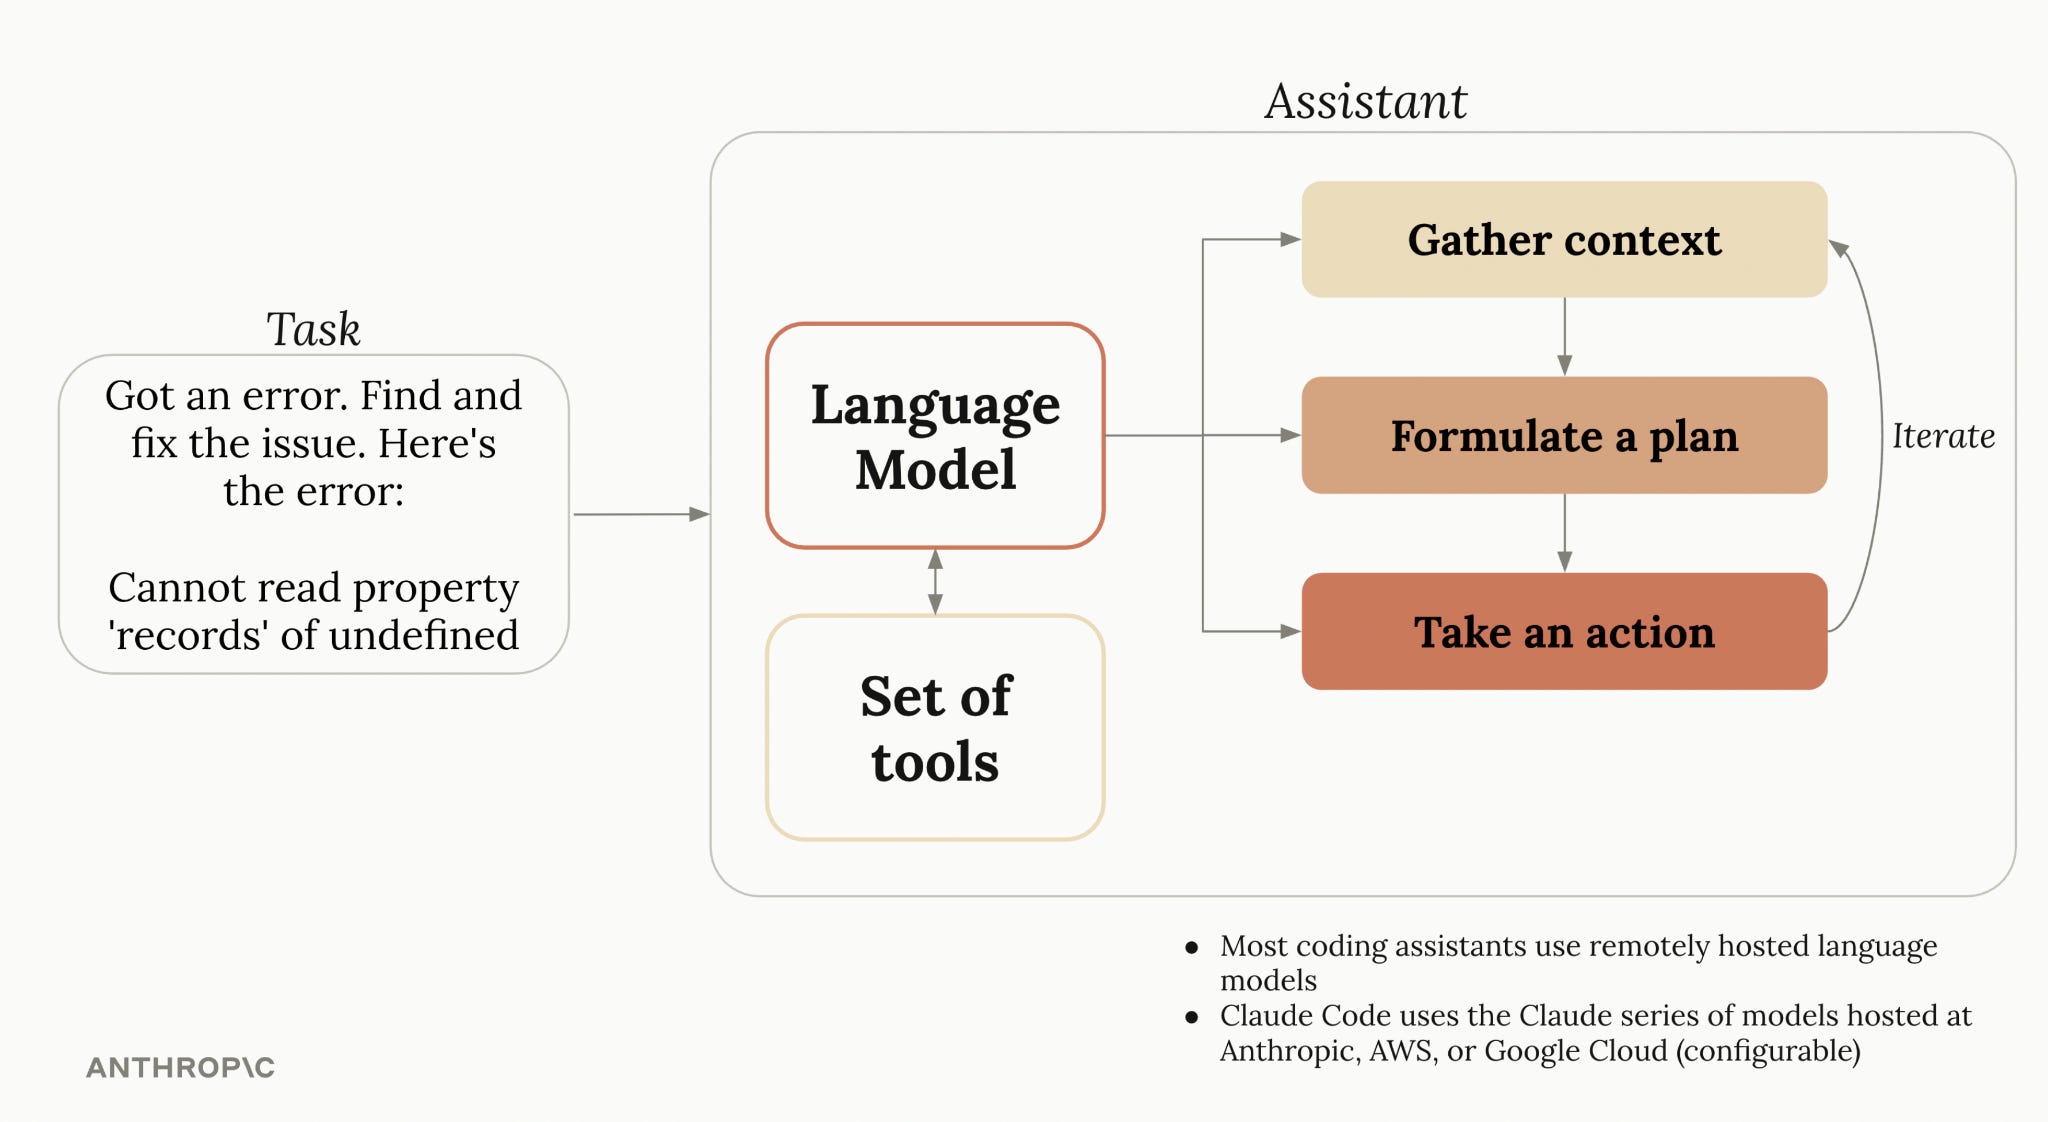
A very good framework to keep in your mind when you think about Claude Code, you’re dealing with two layers:
The Model (Claude the LLM)
The Productized Environment built around it (Claude Code).
Claude Models are your standard LLMs while the current models of Claude are multimodal (text, pictures, charts documents etc.), they still work on a simple principle: Text Input -> Some Output. On its own, it is just a stateless reasoning machine taking input & spitting out an output. But it’s a really smart reasoning machine with immense thinking capabilities. It can be tooled in any way to give you what you want. Anthropic has a few of these models. Claude Opus is the current best model out there.
Claude Code on the other hand is the orchestrator built around the LLM. It is a middleman between you & the LLM. It has a built-in (& extensible) list of tools that allow it to understand, interpret & action on your inputs. It is the interaction layer that takes your request, breaks it into actions, and executes them. It does this by injecting extra set of instructions with every prompt to the LLM, which allows the model to think better & request specific actions rather than just generate text responses. It also performs actions if the LLM tells it to.
Here’s a few examples to help frame this thinking:
Example #1
Task: “Plan my trip”
Output:
Claude (LLM):
“Here’s a sample itinerary: Day 1 - Fly to Paris, visit Eiffel Tower. Day 2 - Eat a Baguette…”
Claude Code (AI assistant + LLM):
Pulling your calendar + budget from notes.txt.
Looking for flights & hotel bookings with (Expedia API).
Building your itinerary.
Cross-referencing your schedule in Google Calendar.
Itinerary saved to trips.md
Example #2
Task - “Check & update the website”
Output:
Claude (LLM):
“To update your website, edit the HTML/CSS files, add new content, then deploy via FTP or GitHub Pages.”
Claude Code (AI assistant + LLM):
Found changes needed in index.html and styles.css.
Edited files, ran npm test (all green), deployed to live branch.
Site live at yourdomain.com.
Key Difference: Claude (LLM) reasons & thinks. Claude Code (Assistant) wraps around it as your action taking sidekick making your job much more productive & fast.
Because it lives in a terminal, it can perform a lot more complex & automated actions compared to a chat LLM on the web. Claude Cowork is another product from Anthropic that also works similarly but that’s for later. I would recommend getting started with Claude Code directly even if you’re a non-technical person & build something with it.
Every other new AI term you’ve read about: agents, sub-agents, skills, agent teams, MCPs etc. are all just advanced tools built inside this one product - Claude Code. They are tools built in Claude Code to help it perform complex computing tasks. There you’re all caught up now (theoretically at least). You can also see how AI Assistants have quickly ushered in a new era of product development that previously had higher entry barriers.
#2 - Planning Mode vs Thinking Mode
Claude Code has these two distinct modes & they can help you use it more efficiently. They solve different problems. Think of them as tools to make the LLM analyze your task more broadly (planning) vs more deeply (thinking) to solve your problem.
Planning Mode - is for tasks that require a Wide understanding of the project before anything changes. Claude in this mode can read through all your relevant files, ask you questions, build an implementation plan, and present it for your review before taking any action. Useful for anything multi-file, required broader context or where the full scope isn’t immediately clear. Use it for researching & planning thoroughly.
Thinking Mode - is for tasks that require Depth on a specific problem — complex logic, deeper research, a difficult bug, something that needs more complex and thorough reasoning. It comes in levels - (think, think more, think a lot, think longer & Ultrathink)**. Each level gives Claude more reasoning space before it responds.
** = Anthropic has since changed how this works now. It no longer needs these keywords to trigger it. It is now labeled as ‘Extended Thinking’ & is triggered by the /effort command. It is set to medium as the default to balance token usage and should be changed as per your task.

The underlying principle still remains the same - higher effort level for deeper reasoning. My experience using these modes is that Claude will sometimes ask questions or give solutions that you haven’t even thought of. I also use it to align Claude’s thinking in a way I want it to think (e.g. assume you’re an engineer, developer, designer, product manager etc.) while engaging these modes.
Both consume additional tokens, so they’re worth applying selectively. Practice with it often to make your understanding & use of these modes more efficient.
#3 - Context Management
Something the course highlights: Context Management & Control. Claude holds onto everything in a conversation/session — entire codebases, files, images, errors, earlier instructions, abandoned approaches etc. Over time, as the sessions extend longer, the context window limits kick in. Claude will start to lose context & its performance starts to degrade.
The basic commands available are great in managing this - /compact & /clear. /compact summarizes the conversation while keeping what Claude has actually learned — good for continuing with a related task. /clear wipes it entirely, useful when switching to a new task.

However, a third very useful feature that the course highlighted was the *double-tap* esc. Double tapping the esc button displays earlier points in the conversation in the session. If a set of prompts with Claude is out of the context of your main task/conversation, this command allows you to recover back to the point where Claude went out of context and branch out the conversation from there.
As of March 2026, Anthropic has updated the default context window to 1M tokens from a previous 200k token limit. It is available in all of Claude’s 4.6 models.
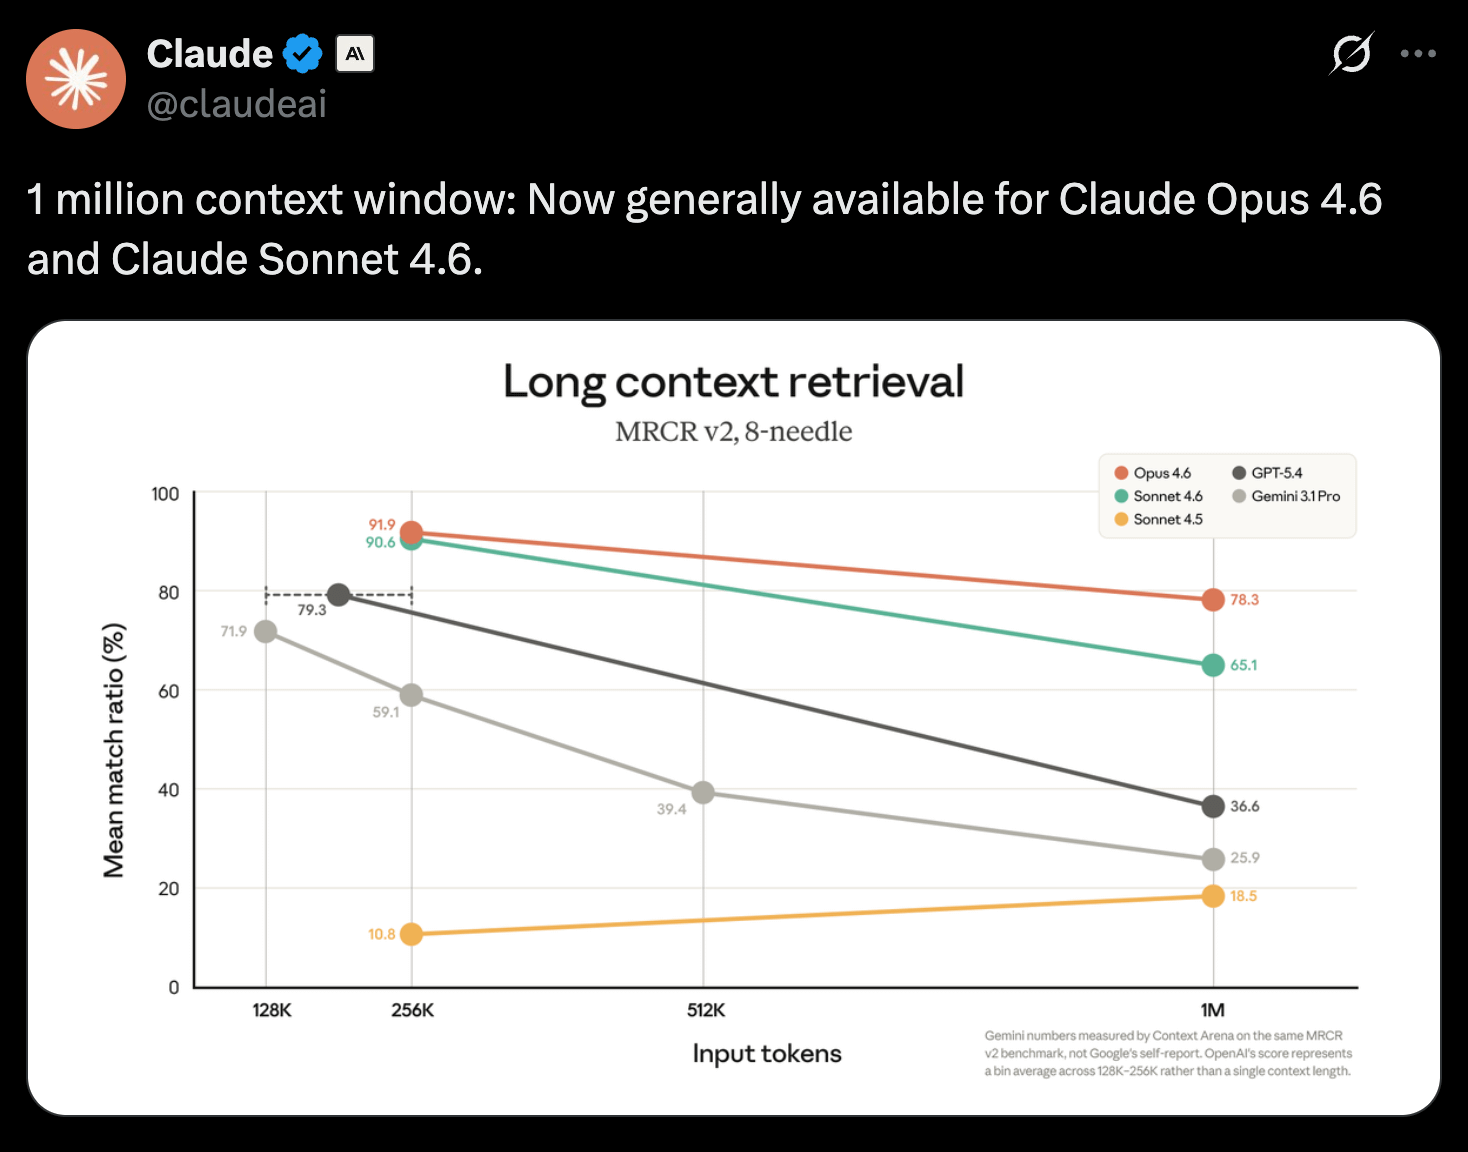
This allows Claude to hold a much larger context and you should be able to go longer in a session before ever needing to worry about it. However, as you build your experience working with bigger projects, these additional basic tools will always aid in making Claude much more efficient.
#4 - Visual Screenshots + Context = Better Outputs
The next practical tip from the course: when working on something visual — a UI component, a layout change, anything interface-related — paste screenshots alongside your written description rather than relying on words alone.

Giving Claude a visual reference alongside the instruction reduces ambiguity. It’s easier for it to understand what you’re pointing at when it can actually see it. Without it, it just has a user prompt that it has to understand and reference in a code base and fix. Visuals + a description provide it with a more precise context.
#5 - Hooks
Hooks are a very interesting set of tools that let you run branch actions/commands/events at specific points in a system/Project of Claude Code. It can be run either just before a tool (action) is called (PreToolUse) or just after (PostToolUse).
A PreToolUse hook can inspect what Claude is about to do and block it if needed. A PostToolUse hook runs in response to an output from Claude. Some common use cases are auto-formatting a file, logging what was changed, running tests automatically, access control, and code quality checks.
It’s how you bring your own processes into the workflow rather than relying entirely on what Claude does on its own.
Here’s a few examples to help frame this thinking:
Example #1
Workflow - Automated content approval system
Pre-Tool Use:
An example here would be that before Claude publishes a blog post (e.g. to a CMS or Markdown site), a custom action needs to check whether the file is in the drafts folder. If yes, it blocks publishing and says: “Move to posts folder to allow publishing”. This is where a pre tool hook is used to trigger this action.
Post-Tool Use:
An example of a post-tool hook in this workflow can be that Claude sends an email and a slack alert to the marketing team saying “New blog post has been published” and show the author & time stamp.
Example #2
Workflow - Automated code edits
Pre-Tool Use:
Before Claude edits a file, a hook checks the path. If it’s *.env or config/db.yml, it blocks the edit with a message: “Editing config files requires manual review.”
Post-Tool Use:
After a code edit (e.g., src/api/handler.rs) is complete, a hook runs rustfmt/prettier, linters, and tests, then logs what changed to an audit file.
Hooks are pretty common use if you’re a dev. But with Claude, it shows that these can be designed now in non-technical automation workflows as well.
The course also covers a standard set of hooks available with Claude. I’d encourage you to go over them and practice incorporating them into your projects.
#6 - MCP Servers
MCP servers are just APIs for AI. They are set of tools that make an out-of-the-box Claude Code much more powerful. By default, Claude can read files, run commands and interact with your codebase. MCPs allow it to connect with external services & harness additional capabilities that your workflow might need.
The playwright mcp is the example the course uses. Install it and it gives the AI assistant the ability to open a browser, operate your running app, and make decisions based on what it sees on screen — not just what the code says. For UI & testing work especially, this makes the AI assistant much more powerful.
The MCP ecosystem has grown quickly & there is a high likelihood that an MCP server already exists for a product you use everyday for your work. I’d encourage to connect those to Claude Code (just prompt it to connect to your MCP) & start there. It will significantly boost Claude’s outputs in terms of automation, speed & quality.
Final Thoughts
The course is free and worth taking even if you might know many of these tools already. The best practice is to install Claude Code, experiment & just build something with it. Then come back and take the course. You will learn and grasp it a lot faster. You can get started with it here.
I hope you enjoyed reading this and took away meaningful insights of your own. I’ll be writing more about building with AI as I go.
More to come.
Very insightful summary 🙌 I am excited to read your next writing!
Great summary! I'd recommend it to anyone looking to get familiar with CC. 💯